
 12 5月. 2025
 CloudFront ログは、ユーザーのトラフィックパターン、リクエスト、アプリケーションとの全体的なやり取りを把握するための強力なツールです。しかし、生のログだけでは実用的な洞察はあまり得られません。
これらのログをより有効に活用するために、IP アドレスに基づく地理的位置 (GeoIP) や、ユーザーエージェント文字列から抽出したデバイスおよびブラウザ情報などの追加データでログを拡充することができます。
このガイドでは、Java で Apache Beam パイプラインを構築し、CloudFront ログを拡充する方法を、以下の 2 つの主要な手順で説明します。
CSV ファイルから PostgreSQL データベースに GeoIP データを同期する。
S3 から毎日の CloudFront ログを読み取り、デバイス、ブラウザ、および GeoIP データで拡充し、拡充されたデータを PostgreSQL データベースに保存する。
さあ、始めましょう!
Apache Beam とは?
実装に進む前に、Apache Beam とは何か、そしてなぜそれがデータパイプラインの構築に最適なツールであるのかを理解することが重要です。
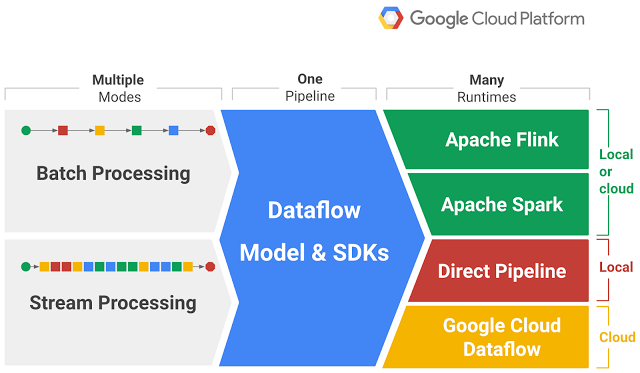
Apache Beam は、バッチデータ処理とストリーミングデータ処理の両方のパイプラインを定義するための統合オープンソースモデルです。Java、Python、Go など、さまざまな言語でパイプラインを記述するための一貫した API を提供します。
Apache Beam の最大の強みは、次のような複数の実行エンジン(「ランナー」)でパイプラインを実行できることです。
Google Cloud Dataflow: Google Cloud 上でストリームおよびバッチデータ処理を実現するフルマネージド サービス。
Apache Flink: 分散ストリーム処理フレームワーク。
Apache Spark: 大規模データ処理のための高速エンジン。
Direct Runner: テストおよび開発目的でパイプラインをローカルで実行するためのもの。Apache Beam の概要

Apache Beam の主なメリット
移植性: 一度書けばどこでも実行可能。同じ Beam パイプラインを複数のランナーで実行できるため、非常に柔軟です。
統合モデル: バッチ処理とストリーム処理の両方をサポートしているため、同じフレームワーク内でさまざまなデータシナリオに対応できます。
拡張性: 豊富な I/O コネクタにより、クラウドストレージシステム(Amazon S3、Google Cloud Storage など)、データベース(PostgreSQL、MySQL など)などに簡単に接続できます。
スケーラビリティ: Beam パイプラインは水平方向にスケーリングできるため、大規模なデータ処理に適しています。
この記事では、Apache Beam と Java を使用して、GeoIP データの同期用と CloudFront ログの拡充用の 2 つのパイプラインを構築します。
ステップ 1: CSV から PostgreSQL への GeoIP データの同期
GeoIP データを使用すると、IP アドレスを国、地域、都市などの地理的な場所にマッピングできます。
常に正確で最新の位置情報データを確保するには、この情報をCSVファイルからPostgreSQLデータベースに定期的に(例:毎週)同期する必要があります。
パイプラインの概要
最初のパイプラインでは、以下の処理を行います。
GeoIP CSVファイルを読み取ります。
CSVデータをJavaオブジェクトに解析します。
解析したデータをPostgreSQLテーブルに書き込みます。

PostgreSQLテーブルの設定
始める前に、GeoIPデータを格納するためのPostgreSQLテーブルが必要です。簡単なスキーマは以下のとおりです。
CREATE TABLE IF NOT EXISTS city_location
(
    geoname_id            INTEGER primary key,
    locale_code           VARCHAR(255),
    continent_code        VARCHAR(255),
    continent_name        VARCHAR(255),
    country_iso_code      VARCHAR(255),
    country_name          VARCHAR(255),
    subdivision1_iso_code VARCHAR(255),
    subdivision1_name     VARCHAR(255),
    subdivision2_iso_code VARCHAR(255),
    subdivision2_name     VARCHAR(255),
    city_name             VARCHAR(255),
    metro_code            VARCHAR(255),
    time_zone             VARCHAR(255)
);

CREATE TABLE network_location
(
    id                             serial primary key,
    network                        inet,
    geoname_id                     INTEGER,
    registered_country_geoname_id  INTEGER,
    represented_country_geoname_id INTEGER,
    is_anonymous_proxy             BOOLEAN,
    is_satellite_provider          BOOLEAN,
    postal_code                    VARCHAR(255),
    latitude                       DOUBLE PRECISION,
    longitude                      DOUBLE PRECISION,
    accuracy_radius                INTEGER
);

CREATE INDEX idx_network on network_location (network);
パイプラインの実装
Create a DTO called NetworkLocation and CityLocation
// Import excluded for brevity

@AutoValue
@DefaultCoder(SchemaCoder.class)
@DefaultSchema(AutoValueSchema.class)
public abstract class NetworkLocation {

    @Nullable
    public abstract String getNetwork();

    @Nullable
    public abstract Integer getGeonameId();

    @Nullable
    public abstract Integer getRegisteredCountryGeonameId();

    @Nullable
    public abstract Integer getRepresentedCountryGeonameId();

    @Nullable
    public abstract Boolean getIsAnonymousProxy();

    @Nullable
    public abstract Boolean getIsSatelliteProvider();

    @Nullable
    public abstract String getPostalCode();

    @Nullable
    public abstract Double getLatitude();

    @Nullable
    public abstract Double getLongitude();

    @Nullable
    public abstract Integer getAccuracyRadius();

    public static Builder builder() {
        return new AutoValue_NetworkLocation.Builder();
    }

    @AutoValue.Builder
    public abstract static class Builder {
        public abstract Builder setNetwork(String network);

        public abstract Builder setGeonameId(@Nullable Integer geonameId);

        public abstract Builder setRegisteredCountryGeonameId(@Nullable Integer registeredCountryGeonameId);

        public abstract Builder setRepresentedCountryGeonameId(@Nullable Integer representedCountryGeonameId);

        public abstract Builder setIsAnonymousProxy(Boolean isAnonymousProxy);

        public abstract Builder setIsSatelliteProvider(Boolean isSatelliteProvider);

        public abstract Builder setPostalCode(@Nullable String postalCode);

        public abstract Builder setLatitude(@Nullable Double latitude);

        public abstract Builder setLongitude(@Nullable Double longitude);

        public abstract Builder setAccuracyRadius(@Nullable Integer accuracyRadius);

        public abstract NetworkLocation build();
    }
}
@AutoValue
@DefaultSchema(AutoValueSchema.class)
@DefaultCoder(SchemaCoder.class)
public abstract class CityLocationDto{

    @Nullable
    public abstract Integer getGeonameId();

    @Nullable
    public abstract String getLocaleCode();

    @Nullable
    public abstract String getContinentCode();

    @Nullable
    public abstract String getContinentName();

    @Nullable
    public abstract String getCountryIsoCode();

    @Nullable
    public abstract String getCountryName();

    @Nullable
    public abstract String getSubdivision1IsoCode();

    @Nullable
    public abstract String getSubdivision1Name();

    @Nullable
    public abstract String getSubdivision2IsoCode();

    @Nullable
    public abstract String getSubdivision2Name();

    @Nullable
    public abstract String getCityName();

    @Nullable
    public abstract String getMetroCode();

    @Nullable
    public abstract String getTimeZone();

    public static Builder builder() {
        return new AutoValue_CityLocationDto.Builder();
    }

    @AutoValue.Builder
    public abstract static class Builder {
        public abstract Builder setGeonameId(Integer geonameId);

        public abstract Builder setLocaleCode(String localeCode);

        public abstract Builder setContinentCode(String continentCode);

        public abstract Builder setContinentName(String continentName);

        public abstract Builder setCountryIsoCode(String countryIsoCode);

        public abstract Builder setCountryName(String countryName);

        public abstract Builder setSubdivision1IsoCode(String subdivision1IsoCode);

        public abstract Builder setSubdivision1Name(String subdivision1Name);

        public abstract Builder setSubdivision2IsoCode(String subdivision2IsoCode);

        public abstract Builder setSubdivision2Name(String subdivision2Name);

        public abstract Builder setCityName(String cityName);

        public abstract Builder setMetroCode(String metroCode);

        public abstract Builder setTimeZone(String timeZone);

        public abstract CityLocationDto build();
    }
}
ここではGoogle AutoValueを使用しています。Apache BeamでAutoValueを使用すると、定型コードが削減され、一貫性が確保されるため、不変データ転送オブジェクト(DTO)の作成が簡素化されます。また、型安全性と可読性が向上し、Beamパイプラインの保守とデバッグが容易になります。
Now, let’s create the GeoIP pipeline.
public class GeoIpPipeline {
    private static final Logger log = LoggerFactory.getLogger(GeoIpPipeline.class);
    private static final String CITY_LOCATION_SQL = """
            INSERT INTO city_location (geoname_id, locale_code, continent_code, continent_name,
                           country_iso_code, country_name, subdivision1_iso_code, subdivision1_name,
                           subdivision2_iso_code, subdivision2_name, city_name, metro_code, time_zone)
            VALUES (?, ?, ?, ?, ?, ?, ?, ?, ?, ?, ?, ?, ?)
            """;

    private static final String NETWORK_LOCATION_SQL = """
            INSERT INTO network_location (network, geoname_id, registered_country_geoname_id, represented_country_geoname_id,
                              is_anonymous_proxy, is_satellite_provider, postal_code, latitude, longitude,
                              accuracy_radius)
            VALUES (cast(? as inet), ?, ?, ?, ?, ?, ?, ?, ?, ?)
            """;

    public static void main(String[] args) {
        GeoIpOptions options = PipelineOptionsFactory
                .fromArgs(args)
                .withValidation()
                .as(GeoIpOptions.class);

        JdbcIO.DataSourceConfiguration dbConfig = JdbcIO.DataSourceConfiguration.create(options.getJdbcDriver(), options.getJdbcUrl())
                .withUsername(options.getDbUser())
                .withPassword(options.getDbPassword());

        Pipeline pipeline = Pipeline.create(options);
        pipeline
                .apply("Load City Locations", TextIO.read()
                        .from(options.getCityLocationS3())
                        .withSkipHeaderLines(1)
                )
                .apply("Convert to Dto", MapElements
                        .into(TypeDescriptor.of(CityLocationDto.class))
                        .via(new CsvToCityLocation()))
                .apply("Write City Location to DB", JdbcIO.<CityLocationDto>write()
                        .withDataSourceConfiguration(dbConfig)
                        .withStatement(CITY_LOCATION_SQL)
                        .withPreparedStatementSetter(new CityLocationPreparedStatementSetter())
                );

        pipeline.apply(Create.of(Arrays.asList(options.getNetworkLocationS3().split(","))))
                .apply("Load Network Locations", FileIO.matchAll())
                .apply(FileIO.readMatches())
                .apply(TextIO.readFiles().withSkipHeaderLines(1))
                .apply("Convert to Dto", MapElements
                        .into(TypeDescriptor.of(NetworkLocation.class))
                        .via(new CsvToNetworkLocation()))
                .apply("Write Network Location to DB", JdbcIO.<NetworkLocation>write()
                        .withDataSourceConfiguration(dbConfig)
                        .withStatement(NETWORK_LOCATION_SQL)
                        .withPreparedStatementSetter(new NetworkLocationPreparedStatementSetter())
                );
        pipeline.run().waitUntilFinish();

    }
}
このコードでは、以下の処理が行われます。
TextIO.read() を使用して GeoIP CSV ファイルを読み取ります。
カスタム MapElements を使用して、CSV ファイルを NetworkLocation オブジェクトと CityLocation オブジェクトに解析します。
最後に、JdbcIO.write() を使用して PostgreSQL テーブルにデータを挿入または更新します。
理想的には、このパイプラインは週に 1 回実行し、GeoIP データの同期が失われないようにする必要があります。
ステップ 2: CloudFront ログの読み取りと拡充
2 番目のパイプラインで、真の魔法が起こります。具体的には以下の処理を行います。
S3 から生の CloudFront ログを読み取ります。
IP アドレスやユーザーエージェント文字列などの有用な情報を抽出します。
ログに以下の情報を追加します。
PostgreSQL クエリによる GeoIP データ。
ユーザーエージェント文字列を使用したデバイスとブラウザのデータ。
4. 拡充されたデータを PostgreSQL に保存し、分析を行います。
このパイプラインのアーキテクチャは次のとおりです。

強化されたログ用の PostgreSQL テーブルの設定
強化された CloudFront ログを保存するための新しいテーブルが必要です。
CREATE TABLE IF NOT EXISTS cloudfront_logs
(
    id                          serial8 primary key,
    date                        DATE,
    time                        time,
    x_edge_location             varchar(255),
    sc_bytes                    BIGINT,
    c_ip                        inet,
    cs_method                   varchar(10),
    cs_host                     varchar(50),
    cs_uri_stem                 varchar(255),
    sc_status                   INT,
    cs_referrer                 varchar(255),
    cs_user_agent               text,
    os                          varchar(50),
    browser                     varchar(50),
    device_type                 varchar(20),
    cs_uri_query                varchar(255),
    cs_cookie                   text,
    x_edge_result_type          varchar(255),
    x_edge_request_id           varchar(100),
    x_host_header               varchar(100),
    cs_protocol                 varchar(20),
    cs_bytes                    BIGINT,
    time_taken                  NUMERIC,
    x_forwarded_for             varchar(100),
    ssl_protocol                varchar(255),
    ssl_cipher                  varchar(255),
    x_edge_response_result_type varchar(20),
    cs_protocol_version         varchar(155),
    fle_status                  varchar(20),
    fle_encrypted_fields        varchar(255),
    c_port                      INT,
    time_to_first_byte          NUMERIC,
    x_edge_detailed_result_type varchar(100),
    sc_content_type             varchar(50),
    sc_content_len              BIGINT,
    sc_range_start              BIGINT,
    sc_range_end                BIGINT
);
パイプラインの実装
CloudFront ログの読み取り、拡充、書き込みを行うパイプラインの実装方法は次のとおりです。
public class PipelineMain {
    private static final Logger log = LoggerFactory.getLogger(PipelineMain.class);
    private static final SimpleDateFormat DATE_FORMAT = new SimpleDateFormat("yyyy-MM-dd");
    private static final AtomicInteger COUNTER = new AtomicInteger();
    private static final String CLOUDFRONT_LOG_INSERT = """
            INSERT INTO cloudfront_logs (
                         date, time, x_edge_location, sc_bytes, c_ip, cs_method, cs_host,
                         cs_uri_stem, sc_status, cs_referrer, cs_user_agent, cs_uri_query,
                         cs_cookie, x_edge_result_type, x_edge_request_id, x_host_header,
                         cs_protocol, cs_bytes, time_taken, x_forwarded_for, ssl_protocol,
                         ssl_cipher, x_edge_response_result_type, cs_protocol_version,
                         fle_status, fle_encrypted_fields, c_port, time_to_first_byte,
                         x_edge_detailed_result_type, sc_content_type, sc_content_len,
                         sc_range_start, sc_range_end, os, browser, device_type)
                         VALUES (?, ?, ?, ?, CAST(? AS inet), ?, ?, ?, ?, ?, ?, ?, ?, ?, ?, ?, ?, ?, ?, ?, ?, ?, ?, ?, ?, ?, ?, ?, ?, ?, ?, ?, ?, ?, ?, ?)
            """;

    public static void main(String[] args) {
        PipelineOptions options = PipelineOptionsFactory
                .fromArgs(args)
                .withValidation()
                .as(PipelineOptions.class);
        final var date = options.getDate() != null ? options.getDate() : new Date(System.currentTimeMillis());

        log.info("Pipeline options: {}", options);
        JdbcIO.DataSourceConfiguration dbConfig = JdbcIO.DataSourceConfiguration.create(options.getJdbcDriver(), options.getJdbcUrl())
                .withUsername(options.getDbUser())
                .withPassword(options.getDbPassword());

        var pipeline = Pipeline.create(options);

        var cloudFrontLogs = pipeline.apply("Read from S3", TextIO.read()
                        .from(format("s3://%s/*", options.getS3Bucket()))
                )
                .apply("Convert to DTO", ParDo.of(new DoFn<String, CloudFrontDto>() {
                    @ProcessElement
                    public void processElement(ProcessContext c) {
                        var line = c.element();
                        if (isBlank(line) || line.startsWith("#")) return;
                        c.output(new TsvToCloudFrontDtoTransformer().apply(c.element()));
                    }
                }))
                .apply("Enrich Device Info", MapElements
                        .into(TypeDescriptor.of(CloudFrontDto.class))
                        .via((SerializableFunction<CloudFrontDto, CloudFrontDto>) input -> {
                            if (input == null || input.getCsUserAgent() == null) return input;
                            var userAgent = new UserAgent(URLDecoder.decode(input.getCsUserAgent(), StandardCharsets.UTF_8));
                            var os = userAgent.getOperatingSystem().getGroup().getName();
                            var browser = userAgent.getBrowser().getGroup().getName();
                            var deviceType = userAgent.getOperatingSystem().getDeviceType().getName();
                            return input.toBuilder()
                                    .setOs(os)
                                    .setBrowser(browser)
                                    .setDeviceType(deviceType)
                                    .build();
                        })
                );

        // Write Logs to DB
        cloudFrontLogs.apply("Write Logs to DB", JdbcIO.<CloudFrontDto>write()
                .withDataSourceConfiguration(dbConfig)
                .withStatement(CLOUDFRONT_LOG_INSERT)
                .withPreparedStatementSetter(new CloudfrontLogPreparedStatementSetter())
        );

        pipeline.run().waitUntilFinish();
    }

    public static Date getSqlDate(LocalDate date) {
        var time = date.atStartOfDay()
                .atZone(ZoneId.systemDefault())
                .toInstant()
                .toEpochMilli();
        return new Date(time);
    }
}
説明
CloudFront ログの読み取り:まず、TextIO.read() を使用して S3 バケットから生の CloudFront ログを読み取ります。各ログは CloudFrontLog オブジェクトに解析されます。
GeoIP エンリッチメント:ログから IP アドレスを抽出し、PostgreSQL の GeoIP テーブルにクエリを実行して対応する地理的位置を取得します。
ユーザーエージェント エンリッチメント:ログからユーザーエージェント文字列を抽出し、ユーザーエージェント解析ライブラリを使用してデバイスとブラウザの情報を取得します。
PostgreSQL への書き込み:最後に、エンリッチメントされたログデータを PostgreSQL の enriched_logs テーブルに書き込みます。
まとめ
この記事では、Java で記述された Apache Beam パイプラインを使用して、CloudFront ログに GeoIP、デバイス、ブラウザの情報を追加するプロセスを説明しました。
Apache Beam を使用すると、複数のソースからの大規模データを効率的に処理およびエンリッチメントできます。このエンリッチメントされたデータは、より実用的なインサイトを提供し、レポート、分析、意思決定プロセスの強化に活用できます。
Beam のスケーラビリティと柔軟性を活用することで、このアーキテクチャをさらに拡張し、より多くの種類のデータを処理し、データパイプラインで複雑なビジネスロジックを処理できるようになります。
追加のエンリッチメント戦略、最適化、さらには予測分析のための機械学習モデルとの統合など、自由に試してみてください。
今後の機能強化
PostgreSQL は強力なデータベースですが、Elasticsearch など、この種の作業に適したストレージエンジンを選択することもできます。
Elasticsearch の Kibana を使用して、視覚化のための強力なダッシュボードを作成してください。
 Filter